Microsoft Outlook, one of the most widely used email clients, offers a seamless way to create and add signatures to your emails. In this article, we'll guide you through the process of adding a signature in Outlook, ensuring your emails leave a lasting impression.
Key takeaways
- Maintain a Professional Design: ensure your signature is simple, clean, and consistent to reflect professionalism.
- Regular Updates: keep your signature current with any changes in position or contact details to provide accurate information.
- Mobile Optimization: design your signature to be easily readable on mobile devices for a universally good recipient experience.
- Social Media Links: include professional social media profiles to expand your network and engagement opportunities.
- Consider typedesk to add signature in outlook:
- Streamlines the creation and management of signatures across different platforms and devices.
- Offers flexibility through multiple signature templates for various contexts or roles.
- Ensures brand consistency with uniform signatures across the company.
- Simplifies company-wide signature updates, making them quick and painless.
Step 1: Open Outlook Signature Settings
-
For Outlook Desktop Application:
- Open Microsoft Outlook on your computer.
- Click on
Filein the top-left corner of the window. - Select
Optionsfrom the sidebar to open the Outlook Options window. - In the Mail category, click on
Signatures…under the Compose messages section.
-
For Outlook Web (OWA):
- Log in to your Outlook account via your preferred web browser.
- Click on the gear icon in the upper-right corner to open Settings.
- Scroll down and select
View all Outlook settingsat the bottom. - Choose
Mail>Compose and reply.
Step 2: Create Your Signature
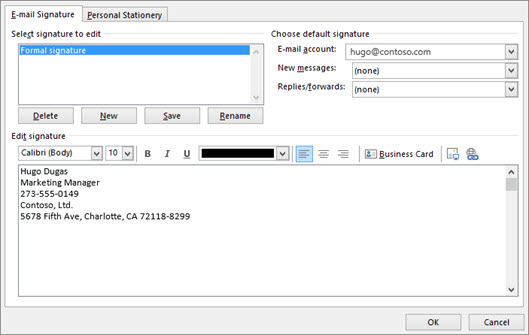
- In the Email Signature tab (Desktop) or Compose and reply settings (Web), you’ll find the option to create a new signature. Click on
New(Desktop) or simply start typing in the text box (Web). - Name your signature for easy identification, especially if you plan to create multiple signatures for different purposes.
Step 3: Design Your Signature
- Use the editor to type in your signature content. You can include your full name, job title, company, phone number, and email address. Feel free to add any other information relevant to your role or personal brand.
- Outlook’s editor allows you to format your text (bold, italic, font size, color) and add hyperlinks, such as linking to your company’s website or your LinkedIn profile.
- For a more personalized touch, consider adding your professional headshot or company logo. Click on the image icon in the editor to insert an image.
Step 4: Customize Signature Settings
-
For Desktop: You can choose default signatures for new messages and replies/forwards under the
Choose default signaturesection. Select your email account and specify which signature to use by default. -
For Web: Below the signature editor, you’ll find options to automatically include your signature in new messages and messages you reply to or forward. Toggle these options as per your preference.
Step 5: Save Your Signature
- Once you’re satisfied with your signature, click
Save(Web) orOK(Desktop) to apply your changes.
Step 6: Insert Signature Manually (Optional)
- If you prefer not to insert your signature automatically for every email, you can add it manually.
- For Desktop: In a new email message, click on
Signaturein the Message menu and select your signature. - For Web: Click on the three dots in the message compose window to open more options and select
Insert signature.
Tips for Creating an Effective Email Signature
- Keep it Professional: Use a simple, clean design. Avoid using too many colors or fonts.
- Update Regularly: Ensure your signature information is always current. Update your signature if your position, phone number, or any other relevant information changes.
- Mobile-friendly: Since many emails are read on mobile devices, make sure your signature looks good on small screens.
- Social Media: Include links to your professional social media profiles or company pages to encourage connections.
- Explore Alternatives like typedesk: While Outlook's built-in signature feature is useful, exploring alternatives like typedesk can offer additional benefits. typedesk enhances your email signature management with its versatile features, making it a great choice for professionals who prioritize efficiency and consistency in their communications.
Creating a signature in Outlook is a straightforward process that can significantly enhance your email communications. By following these steps, you can ensure that every email you send out serves as a reflection of your professionalism and attention to detail.